更新时间:2022-11-18 来源:黑马程序员 浏览量:
NIO概述
NIO介绍
传统IO流(java.io):读写操作结束前,处于线性阻塞,代码简单,安全,性能低
NIO:支持非阻塞式编程,性能更有优势,但代码编写较为复杂。
概念理解
同步(synchronous):一条线程执行期间,其他线程就只能等待。
异步(asynchronous):一条线程在执行期间,其他线程无需等待。
阻塞(blocking):当前任务未执行结束,会阻碍后续任务的执行。
非阻塞(non-blocking):当前任务未执行结束,不会阻碍后续任务的执行。
IO流与NIO的区别
NIO是面向缓冲区,IO 面向流。
NIO是非阻塞的,IO是阻塞的。
NIO可以使用选择器,IO不涉及选择器。
NIO组成
Buffer(缓冲区,负责读写数据,类似火车)
Channel(通道 ,负责传输,类似铁轨)
Selector(选择器,负责调度通道,类似指挥中心)
Buffer
介绍
理解:实质相当于普通IO流中的数组,负责数据的存和取。但是它提供了对数据的结构化访问,可以跟踪系统的读、写进程。
常见分类:ByteBuffer、CharBuffer、DoubleBuffer、FloatBuffer、IntBuffer、LongBuffer、ShortBuffer。
核心属性
capacity:代表缓冲区的最大容量。
limit:代表剩余(可存入/可读取)数量
position:代表(存入/读取)位置
mark:标记当前position的位置。
四个属性关系:mark <= position <= limit <= capacity
构造方法(以ByteBuffer为例)
static ByteBuffer allocate(int capacity)分配一个新的字节缓冲区。
static ByteBuffer allocateDirect(int capacity) 分配新的直接字节缓冲区。
static ByteBuffer wrap(byte[] array)将 byte 数组包装到缓冲区中。
常用方法
获取属性值
capacity():获取缓冲区的最大容量。
limit():获取剩余(可存入/可读取)数量。
position():获取(存入/读取)位置。
mark():标记当前position的位置。
存取数据
put(Xxx[] xxx) 存入数据到缓冲区中,position >= limit不可写。
get() 获取缓冲区的position位置数据,并将position后移,position >= limit不可读。
核心方法
flip()翻转此缓冲区(limit=capacity-postion,postion=0),清除标记,用于读取模式。
clear()清除此缓冲区(limit=capacity,postion=0),清除标记,用于写入模式。
rewind() 倒回这个缓冲区(position=0),清除标记。
reset() 将此缓冲区的位置重置为先前标记的位置(position=mark)。
演示代码
public class Test01Buffer {
    public static void main(String[] args) {
        //新建缓冲区对象(默认为写入模式)
        ByteBuffer b = ByteBuffer.allocate(10);

        //写入数据
        System.out.println("====写入模式属性状态====");
        showProperty(b);
        System.out.println("====读取模式属性状态====");
        //切换为读取模式
        b.flip();
        showProperty(b);

        System.out.println("====写入数据====");
        b.clear();
        b.put(new byte[]{1,2});
        showProperty(b);

        System.out.println("====读取数据====");
        b.flip();
        System.out.println("position-------->" + b.position() + ",get:" + b.get());
        //循环遍历通用格式
        //while (b.position()<b.limit()){
        //    System.out.println("position-------->" + b.position() + ",get:" + b.get());
        //}

        System.out.println("====重置操作位置前:记录位置====");
        showProperty(b);
        //记录位置
        b.mark();
        System.out.println("====重置操作位置前:获取新数据====");
        System.out.println("position-------->" + b.position() + ",get:" + b.get());
        showProperty(b);
        System.out.println("====重置操作位置后====");
        b.reset();
        showProperty(b);

        System.out.println("====倒回缓冲区前====");
        showProperty(b);
        System.out.println("====倒回缓冲区后====");
        b.rewind();
        showProperty(b);
    }

    //展示参数
    public static void showProperty(ByteBuffer b) {
        //容量
        System.out.println("capacity:" + b.capacity());
        //可存放个数
        System.out.println("limit:" + b.limit());
        //下一个存入位置
        System.out.println("position:" + b.position());
    }
}
Channel入门
介绍
理解 Channel理解为通道,包含了写入和读取的操作,可以理解为IO中的流对象。Channel负责读写,Buffer负责存取。
常见分类:FileChannel、SocketChannel、ServerSocketChannel、DatagramChannel
Channel与IO流区别
Channel是双向的,既可以读又可以写,而IO是单向的。
Channel可以进行异步的读写,IO是不支持异步。
Channel的读写必须通过buffer对象,IO通过流可以直接读写。
构造方法(以FileChannel为例 )
在IO流FileXXX字节流中提供了getChannel()方法获取FileChannel对象。
FileChannel getChannel() 通过FileXXX字节流的方法获取对象
常用方法
int read(ByteBuffer dst):将数据读取到缓冲区中
int write(ByteBuffer src):将数据从缓冲区中写出到指定位置
演示代码
public class Test02FileChannel {
    public static void main(String[] args) throws IOException {
        FileChannel in = new FileInputStream("D:\\image.jpg").getChannel();
        FileChannel out = new FileOutputStream("D:\\imageCopy.jpg").getChannel();

        ByteBuffer b = ByteBuffer.allocate(10);
        int len = -1;
        while ((len = in.read(b)) != -1) {
            b.flip();
            out.write(b);
            b.clear();
        }
        in.close();
        out.close();
    }
}
ChannelTCP协议编程
介绍
NIO中通过SocketChannel与ServerSocketChannel替代TCP协议的网络通信编程
客户端通道操作
SocketChannel 客户端通道,用于读写TCP网络协议数据
获取对象 public static SocketChannelopen()
连接服务器 boolean connect(SocketAddress remote)
SocketAddress是抽象类,使用其子类InetSocketAddress创建的对象。InetSocketAddress(String ip,int port)
等待客户端连接 SocketChannel accept()
服务端通道操作
ServerSocketChannel 服务端通道,用于服务端监听TCP连接
获取对象 public static ServerSocketChannel open()
绑定端口号 ServerSocketChannel bind(SocketAddress local)
服务器代码
public class Test03ServerByChanner {
    public static void main(String[] args) throws IOException {
        //获取服务器通道对象
        ServerSocketChannel serverSocket = ServerSocketChannel.open();
        //绑定端口
        ServerSocketChannel socket = serverSocket.bind(new InetSocketAddress(8888));
        SocketChannel server = socket.accept();

        //接收数据
        System.out.println("服务端开始接收数据......");
        ByteBuffer buffer = ByteBuffer.allocate(1024);
        int len = -1;
        while ((len = server.read(buffer)) != -1) {
            //翻转缓冲区,读取数据
            buffer.flip();
            System.out.println("server:" + new String(buffer.array()));
            buffer.clear();
        }

        System.out.println("服务端开始反馈数据......");

        buffer.put("数据收到了".getBytes());
        //翻转缓冲区,读取数据
        buffer.flip();
        //取出缓冲区数据,写会给客户端
        server.write(buffer);

        server.close();

    }
}
客户端代码
public class Test03ClientByChannel {
    public static void main(String[] args) throws Exception {
        //获取连接对象
        SocketChannel client = SocketChannel.open();
        //连接服务器
        client.connect(new InetSocketAddress("localhost", 8888));

        //发送数据
        System.out.println("客户端开始发送数据......");
        ByteBuffer buffer = ByteBuffer.allocate(1024);
        buffer.put("服务器,你好啊".getBytes());
        //翻转缓冲区,读取数据
        buffer.flip();
        //从缓冲区取出数据写入通道
        client.write(buffer);
        client.shutdownOutput();

        //等待反馈
        buffer.clear();
        int len = -1;
        while ((len = client.read(buffer)) != -1) {
            buffer.flip();
            System.out.println("client:" + new String(buffer.array()));
            buffer.clear();
        }
        //关闭客户端
        client.close();
    }
}
多路复用
介绍
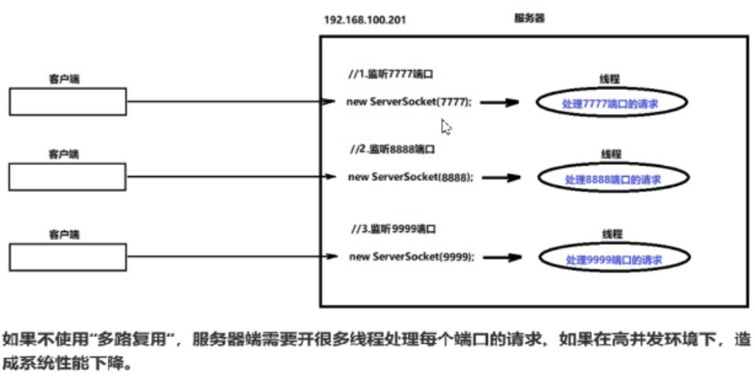
非多路复用:服务器端需要为每个端口的每次请求,开辟线程处理业务,高并发状态下会造成系统性能下降。

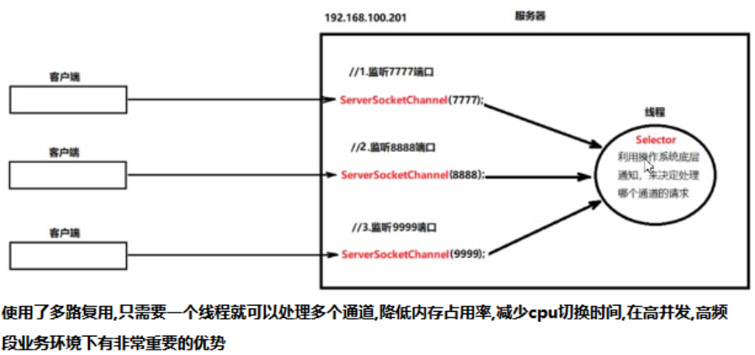
多路复用:服务器端利用一个线程处理多个端口的访问请求,节省CPU资源,提高程序运行效率,高并发状态下有明显优势。

核心知识
1.通过Selector中的open方法,获取选择器对象
public static Selector open():获取Selector对象
2.通过Channel中的方法,注册通道给选择器
①创建通道对象,设置通道屏蔽模式
void configureBlocking(boolean block)
②将通道注册给选择器,并设置该通道的关注事件
SelectionKey register(Selector sel,int ops)
Selector sel 要注册的选择器
ops表示注册的事件类型,在 SelectionKey类中提供的四种类型实现。
SelectionKey.OP_ACCEPT : 接收连接就绪事件,表示服务器监听到了客户连接,服务器可以接收这个连接了
SelectionKey.OP_CONNECT:连接就绪事件,表示客户端和服务器的连接已经建立成功
SelectionKey.OP_READ: 读就绪事件,表示通道中有了可读的数据,可以执行读操作了
SelectionKey.OP_WRITE: 写就绪事件,表示已经可以向通道中写数据了
注意事项
被注册的Channel必须支持异步模式,否则异步NIO就无法工作,例如FileChannel(没有异步模式)不能被注册到Selector。
ServerSocketChannel在注册时,只能使用以OP_ACCEPT状态注册,否则抛出异常。
SocketChannel在注册时,不支持OP_ACCEPT状态注册。
3.通过Selector中的方法,获取事件
int select():将事件存放至事件集合,返回已就绪事件个数。如果没有新的已就绪事件,该方法将持续阻塞。
Selector的Set selectedKeys():返回选择器的已就绪事件集。
Set keys():返回选择器的感兴趣事件集(已注册的事件数)。
SelectionKey概述
SelectionKey 代表一个通道在Selector的注册事件关系键。
当Selector通知某个传入事件时,是通过对应 SelectionKey 进行传递的。
想要取消已注册的通道事件,需要通过SelectionKey的cancel方法完成。
SelectionKey中属性:
Interest set:兴趣集,表示已注册的事件集合,下一次调用方法,将测试是否有此事件的加入。
通过SelectionKey的 int interestOps() 方法,可以获取当前 SelectionKey的感兴趣事件。
Ready set:准备集,表示已准备就绪的事件集合。
通过SelectionKey的 int readyOps()方法,可以获取当前 SelectionKey的准备就绪事件。
Channel:事件对应的通道。
通过SelectionKey的 SelectableChannel channel()方法,可以获取当前 SelectionKey的表示的通道。
Selector:事件绑定的选择器。
通过SelectionKey的 Selector selector() 方法,可以获取当前 SelectionKey的绑定的选择器。
Attached:事件对象的附加信息。
通过 SelectionKey的 Object attach(Object ob)方法,将给定对象附加到此键。
通过 SelectionKey的 Object attachment()方法,检索当前的附件。
通过 Channel的SelectionKey register(Selector sel,int ops,Object ob)方法,可以附件及获取附加信
SelectionKey迭代器
4.通过SelectionKey中的方法,判断事件
isAcceptable() 是否有准备好接收新连接
isConnectable() 是否有完成连接状态
isReadable() 是否有处于可读取状态
isWritable() 是否有处于可写入状态
isValid() 是否是有效的键
步骤
1.获取选择器对象
2.创建通道对象,设置异步,注册到选择器
3.定义死循环,重复检查是否有新事件触发(Selector中的int select()方法)
3.1.如果触发新时间,获取所有触发事件集(Selector的Set selectedKeys()方法)
3.2.获取触发事件集合的迭代器
3.3.遍历迭代器,获取所有触发的事件
3.3.1判断触发事件类型,指向相应操作 举例 if (selectionKey.isAcceptable()) {}
3.3.2删除已完成操作的触发事件 (Iterator的remove()方法)
服务器端代码
public class Test04ServerBySelector {
    public static void main(String[] args) throws IOException, InterruptedException {

        //获取一个选择器
        Selector selector = Selector.open();

        //创建三个服务器通道,监听三个端口
        ServerSocketChannel serverChannel1 = ServerSocketChannel.open();
        serverChannel1.bind(new InetSocketAddress(6666));
        serverChannel1.configureBlocking(false);
        ServerSocketChannel serverChannel2 = ServerSocketChannel.open();
        serverChannel2.bind(new InetSocketAddress(7777));
        serverChannel2.configureBlocking(false);
        ServerSocketChannel serverChannel3 = ServerSocketChannel.open();
        serverChannel3.bind(new InetSocketAddress(8888));
        serverChannel3.configureBlocking(false);

        //将三个服务器通道注册给选择器
        serverChannel1.register(selector, SelectionKey.OP_ACCEPT);
        serverChannel2.register(selector, SelectionKey.OP_ACCEPT);
        serverChannel3.register(selector, SelectionKey.OP_ACCEPT);

        //循环监听三个通道
        while (true) {
            System.out.println("--------");
            System.out.println("等待客户端连接...");

            //获取触发的事件个数
            int keyCount = selector.select();//阻塞式方法
            System.out.println("有一个客户端连接成功...");
            System.out.println("已就绪事件个数=" + keyCount);
            System.out.println("注册通道数量=" + selector.keys().size());


            //获取触发事件集
            Set<SelectionKey> selectionKeys = selector.selectedKeys();
            System.out.println("触发事件数量=" + selectionKeys.size());

            //获取事件集迭代器
            Iterator<SelectionKey> it = selectionKeys.iterator();

            //遍历事件集
            while (it.hasNext()) {
                //获取注册键
                SelectionKey selectionKey = it.next();

                //使用选择器完成数据读取
                if (selectionKey.isAcceptable()) {
                    //获取通道对象
                    ServerSocketChannel channel = (ServerSocketChannel) selectionKey.channel();
                    //获取服务器与客户端的连接
                    SocketChannel server = channel.accept();
                    //设置非阻塞
                    server.configureBlocking(false);
                    //注册读取事件
                    server.register(selector, selectionKey.OP_READ);
                    //selectionKey.interestOps(selectionKey.OP_READ);
                } else if (selectionKey.isReadable()) {
                    //获取客户端数据
                    ByteBuffer buffer = ByteBuffer.allocate(1024);
                    SocketChannel server = (SocketChannel) selectionKey.channel();
                    server.read(buffer);
                    buffer.flip();
                    String content = new String(buffer.array(), 0, buffer.limit());
                    System.out.println("客户端发送的数据:" + content);
                    //关闭资源
                    server.close();

                }
                //删除当前触发事件
                it.remove();
            }
            System.out.println("休息1秒,等待下一次操作...");
            Thread.sleep(1000);
        }
    }
}
客户端代码
public class Test04ClientByChannel {
    public static void main(String[] args) {
        int[] ports = {7777, 8888, 6666};
        for (int i = 0; i < ports.length; i++) {
            int port = ports[i];
            new Thread(new Runnable() {
                @Override
                public void run() {
                    try {
                        //创建客户端通道
                        SocketChannel client = SocketChannel.open();
                        //连接服务器
                        client.connect(new InetSocketAddress("localhost", port));
                        //发送数据
                        ByteBuffer buffer = ByteBuffer.allocate(1024);
                        buffer.put("你好啊,哈哈哈".getBytes());
                        buffer.flip();
                        client.write(buffer);
                        //关闭资源
                        client.close();
                    } catch (IOException e) {
                        e.printStackTrace();
                    }
                }
            }).start();
        }
    }
}
异步非阻塞交互(AIO)
介绍
支持异步操作的NIO体系
常见分类:
AsynchronousSocketChannel 客户端异步通道
AsynchronousServerSocketChannel服务端异步通道
AsynchronousFileChannel文件异步通道
AsynchronousDatagramChannel 数据异步通道
CompletionHandler回调接口
void completed(V result,A attachment);异步操作成功被回调。
void failed(Throwable exc,A attachment);异步操作失败时被回调。
AsynchronousSocketChannel常用方法
public static AsynchronousSocketChannel open();打开异步服务器套接字通道。
void read(ByteBuffer dst,A attachment,CompletionHandler handler) 读取数据。
void write(ByteBuffer src,A attachment,CompletionHandler handler) 写出数据
AsynchronousServerSocketChannel常用方法
public static AsynchronousServerSocketChannel open()打开异步服务器套接字通道。
AsynchronousServerSocketChannel bind(SocketAddress local,int backlog) ;绑定服务端IP地址,端口号
void accept(A attachment,CompletionHandler handler) ;接收连接
服务器端代码
package com.NIO.src.com.itheima;

import java.io.IOException;
import java.net.InetSocketAddress;
import java.nio.ByteBuffer;
import java.nio.channels.AsynchronousServerSocketChannel;
import java.nio.channels.AsynchronousSocketChannel;
import java.nio.channels.CompletionHandler;
import java.util.concurrent.ExecutionException;

public class Test05ServerBySynChanner {
    //如果为true,服务器结束。
    static boolean isOver = false;

    public static void main(String[] args) throws IOException, ExecutionException, InterruptedException {


        //获取服务器通道
        AsynchronousServerSocketChannel serverChanner = AsynchronousServerSocketChannel.open();
        //绑定端口号
        serverChanner.bind(new InetSocketAddress(8888));
        // 获取服务器与客户端的对接
        serverChanner.accept("accept", new CompletionHandler<AsynchronousSocketChannel, String>() {
            @Override
            public void completed(AsynchronousSocketChannel result, String attachment) {
                try {
                    isOver=true;
                    System.out.println("接受了一个连接:" + result.getLocalAddress()
                            .toString());
                    // 给客户端发送数据并等待发送完成
                    result.write(ByteBuffer.wrap("From Server:我是服务器".getBytes()))
                            .get();
                    ByteBuffer readBuffer = ByteBuffer.allocate(128);
                    // 阻塞等待客户端接收数据
                    result.read(readBuffer).get();
                    System.out.println(new String(readBuffer.array()));
                } catch (InterruptedException e) {
                    e.printStackTrace();
                } catch (ExecutionException e) {
                    e.printStackTrace();
                } catch (IOException e) {
                    e.printStackTrace();
                }
            }

            @Override
            public void failed(Throwable exc, String attachment) {
                isOver=true;
                System.out.println("连接失败");
            }
        });

        //由于异步执行,所以上述操作不会阻碍当前循环的执行。
        while (true) {
            if (isOver) {
                break;
            }
            System.out.println("服务端:先干为敬");
        }

    }
}
客户端代码
public class Test05ClientBySynChannel {
    public static void main(String[] args) throws IOException, ExecutionException, InterruptedException {

        //创建客户端通道对象
        AsynchronousSocketChannel client = AsynchronousSocketChannel.open();
        //与服务器进行连接
        client.connect(new InetSocketAddress("localhost", 8888), "connect", new CompletionHandler<Void, String>() {
            @Override
            public void completed(Void result, String attachment) {
                System.out.println("连接到服务器成功!");
                try {
                    // 给服务器发送信息并等待发送完成
                    client.write(ByteBuffer.wrap("From client:我是服务器".getBytes())).get();
                    ByteBuffer readBuffer = ByteBuffer.allocate(128);
                    // 阻塞等待接收服务端数据
                    client.read(readBuffer).get();
                    System.out.println(new String(readBuffer.array()));
                } catch (InterruptedException e) {
                    e.printStackTrace();
                } catch (ExecutionException e) {
                    e.printStackTrace();
                }
            }

            @Override
            public void failed(Throwable exc, String attachment) {
                System.out.println("连接到服务器失败");
            }
        });
    }
}